 Thanks to Fab Mama who sent some stitching guide treasures!I've been going through some of the 30s reproductions and looking through Vintage Notions this past week for a nice whip up. Happy Sewing, Heather
1.27.2012
Embroidery & 30s Finds
Thanks to Fab Mama who sent some stitching guide treasures!I've been going through some of the 30s reproductions and looking through Vintage Notions this past week for a nice whip up. Happy Sewing, Heather1.25.2012
baby quilts

I'm playing in fabric!

I've been rummaging though my stash to see if I could find a nice set
of material for a baby quilt or two...
if I keep it up I might have a few piles to choose from.
You know, it occurred to me
that if you haven't met me in real life {and maybe even if you have!},
you probably think I rarely finish ANY quilts....
most of the baby & toddler quilts I've made have been
for charity or gifts &
I didn't even consider taking photos.
So going forward, I'll be sure to snap a shot and share.
I'm really looking forward to some quality time in the studio
{though we're still moving things around to make room for my Lil Miss}.
I never thought I'd actually look forward to sharing the sewing room!
Happy Quilting,
Heather
1.22.2012
Try Try Again

The third time's the charm on the French Macarons.

This batch went so smoothly...
less cocoa than the first batch
but yummy and chocolatey &

perfect.
{yeah, you'll rarely find me saying that about anything}
When I first saw the feet forming,
I clapped my hands like a giddy school girl
and jumped around the kitchen.
Can't wait to share this batch and make another
few dozen just for fun.
Whatever challenge awaits you,
keep at it.
It's worth trying a few times to get it right.
It's worth trying a few times to get it right.
Best Wishes,
Heather
1.19.2012
Pom Pom Tutorial

Today, we'll be making pastel pom-poms.
They're great little additions to your baby showers
and wedding showers, bridesmaids luncheons, little girls' rooms, etc.

Supplies:
Wire {we used floral wire}
Tulle in various colors to
match your theme
Ribbon to hang completed poms

you're welcome to use whatever size you have.
The larger size you use, the larger the resulting pom
(of course, you could cut the width down).
Remove the tulle from the roll if it has one.
Double the layers of tulle and begin with both ends
lined up. This will be your starting point.


Make sure your tulle isn't twisted before you begin
or you'll have to cut it apart and straighten with one hand
while trying to keep your gathers together in the other.
while trying to keep your gathers together in the other.

Carefully gather your tulle about a 1/4 to 1/2 inch from the width edge,
gently pushing your wire through
the gathers about every inch or so.
Don't worry about doing this part perfectly---
the gathers will be opened up in the end and
the fullness is all people will see.


while I feed the double tulle gently with my non-dominant.
As the tulle gathers become difficult to hold in my hand, I bend the wire into a U shape to prevent loosening of the gathers. Your wire should be forgiving.


Once I've reached the ends of the tulle, I cross the wire and twist to hold in place.

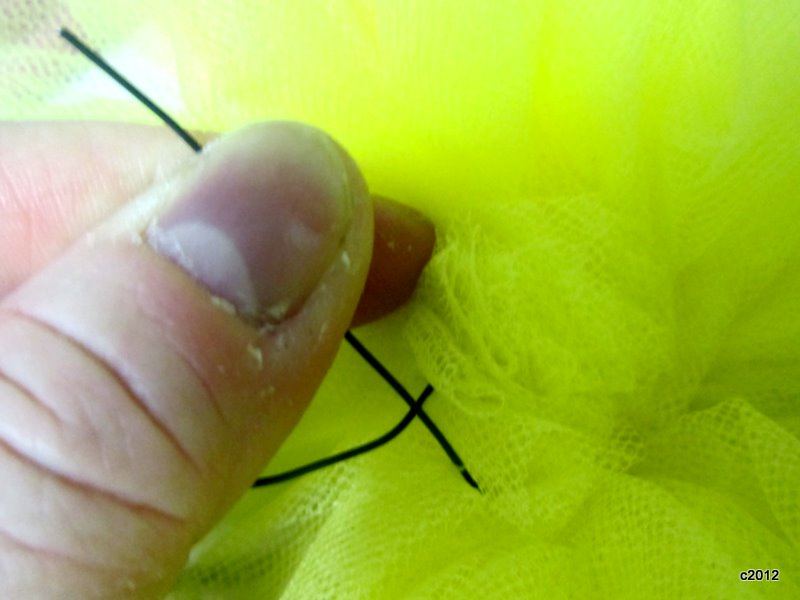

Once your tulle is secure and the wire has been twisted, it should look like this:

Next, separate the layers of tulle by pulling them apart to the wire or
as close to it as you can without tearing your tulle.


Finish by making a hook at the end of the wire.
You'll be hanging your ribbon from this.

I prefer a thicker satin ribbon for hanging, but that's just
personal preference. Thin works, if you've got it on hand.

Have fun crafting!
Heather
=D
1.18.2012
Pastel Pom-Poms
Munchkin and I have been working on some pastel pom-poms
and paper flowers lately. The sewing room will soon be filled.
With baby showers and wedding showers on the calendar,
we'll be sure to share instructions shortly.
Happy Crafting!
Heather
Subscribe to:
Posts (Atom)