8.17.2020


On the very last day of my summer break, I've had a request for another 2 Triple Pouches (Pattern by Aneela Hoey). This time they'll be in a Pencil Club print and Essex Linen in a light gray. I'd have to look it up to give you the actual name but will gladly do so if you're interested. The plan is to keep art supplies in this set and school pencils/pens/markers in the other but plans are often subject to change. In any case, I'm happy someone is enjoying the Aneela Hoey patterns as much as I am. The second and third sets are going smooth as silk. :)

Happy Sewing,

Heather


8.13.2020

Aneela Hoey's Triple Pouch #1 is Complete


Munchkin chose a couple fabrics for the first version of Aneela Hoey's Triple Pouch. It takes some time to complete and to be honest, probably wouldn't make them for anyone else. She's picked out some Pencil Pals & Essex combinations for the next couple. Now that I've made it through the first one, I think the next ones will go a little smoother (fingers crossed). Overall, I'm pleased with the results. 

I love Aneela Hoey's patterns but my sewing experience is limited, so I was doubting myself through the process. Plus, I naturally figure out patterns along the way and often come up with easier methods to complete it a second time. This one...not so much. I spoke with a generous Aneela fan who graciously encouraged me to keep at it, not to read ahead on the directions and to stop thinking my way through it. She assured me I'd be ok. This was also Aneela's advice lol but I guess I needed a little confidence booster. Thank you for your time and for being so kind to answer a late night plea from someone who clearly needed to take a break...which I did for a couple days.

Happy Sewing, 
Heather


8.02.2020

♡ Another Aneela Hoey Applique To Go Bag ♡


Another Aneela Hoey amazing bag. Foxglove is such a gorgeous line, I'm excited I purchased the last set of 1/2 yard online. I still have quite a few of the other prints that could work for some more goodies. I know I said the last bag was my applique to go bag, but I think this may be perfect. 


This was my very first snap!


Happy Sewing,
Heather

7.24.2020

A New Pin Keep & Needle Book Completed


The new fancy needle book/pin keep came together nicely and pretty quickly. I used the older tutorial as a basis and added a few bells and whistles since there will be a coordinated set of Aneela Hoey bags.  I was just chatting with a few people about raw edge applique...but am trying to find some love for the technique and knew this kit would be around a while.

The print is from a set of Aneela Hoey blocks that I seriously considered embroidering over for this project...but time is of the essence, as I'll be back to prepping for school in a week. So, while I was on breaks during a virtual conference this week, I just decided to go for it.
Isn't the print super cute??

Add a little ribbon and some small tool pockets and it's just about right.
 
I also opted for ties on this version to
keep everything inside & to vary the
fit for larger blocks and tools.

7.19.2020

The To Go Bag Comes in Handy


The convertible was in need of some maintenance this weekend. Luckily, the new applique to go bag was in my tote with a new pack of Kona Ash 5" charms. I used my time to prep some more melons for back basting method using my actual size template and a regular pencil on the backside of the fabric pack. The 42 charms were finished quickly, which left plenty of time to make a couple new friends before the car was ready.

I'm terribly aware that I need to get my new eye glass prescription. As a result, the remaining prep is in limbo. So far, the Lizzy House Pearl Bracelet (and Mini Pearl Bracelets) are in the lead for the focus fabrics. I just love polka dots and think the irregular dots on the bias cut will have an interesting overall look. Of course, there's the gorgeous Aneela Hoey Foxglove line (OOOH AHHHH) and the super fun recent Heather Ross goodies, too. As you can see, there are some adorable options to consider.

Originally, I wanted to use just one focus fabric and who knows? Maybe that's what I'll end up doing. If so, I'm leaning towards the navy original Lizzy House pearl bracelet.

For those of you appliqueing along with us, if you're interested in using charm packs rather than cutting your own background fabrics, you can use the 5" charms or the larger 10" layer cakes. For the layer cakes, you'll need to plan on 4 (small template) melons per 10" piece. I'm sticking to the 5" charms so I don't have to think about my handwork to be honest. Each 5" charm can be set up the same way and becomes somewhat automatic as you get further along in the process. That autopilot handwork is what helps ease anxiety and lower blood pressure. The smaller size also allows you to move your melons around, which can be really helpful to those of you using directional prints and of course allows you to play around with the layouts. Do you want the Xs to be the same print and the Os to be mixed or would you rather have the Os the same color? Would you like just the petal look to show in rows? That's certainly an option, too. I don't usually know exactly what the final project will look like until I'm finished with the exception of Dear Jane...that planning is next level and I think that's why I'm just going with the flow on this project.
I have never attempted hand sewing blocks but am certainly willing to give that a try if you are not planning to use a machine at any point. Please just let me know so I can research and get a tutorial together for you, if that's of interest. Also, if you're in Chicagoland and need a machine, I have several and am working on downsizing, thanks to the recent Viking purchase (YAY!).

If you're using the 5" charm packs for background fabrics, please check out the size list here.
For the 10" layer cake size backgrounds, see the counts per size here. Most of the sites say 2 packs for queen, up to 3 for King. Please keep in mind, you'll have to be careful with the planning of the layer cake size if you're using the "small" melons, less so if you purchase the larger Missouri Star template version.

As always, if you get stuck and need some assistance, please reach out and we'll get a video conference set up.


Happy Applique,
Heather


7.14.2020

Where in the World are RF Readers?

t turns out, from all over the globe. A lot of visitors are included in the "other" category. If you don't see your country in the list, please add it to the comments below.
It turns out that RF readers are from all over the globe. A lot of visitors are included in the "other" category. If you don't see your country in the list, please add it to the comments below. I sincerely hope you're enjoying the posts and tutorials and return again soon. Have a wonderful day,
Heather

7.12.2020

APPLIQUE BASICS: Back Basting Method


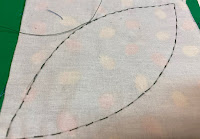
Back basting method is simple and once prepped, can be completed pin free for on the go work. You'll begin by placing your actual size template on the backside of your background fabric and trace the melon shape. Pin your bias scrap to the front of the background fabric, focus fabric also facing up and pin in place temporarily. At this point, your melon shape is visible on the backside and if you flip over to the top side of the background fabric, the focus fabric should be facing out as well.

Flip back to the backside of your chosen background fabric where the melon tracing is. Using a contrasting thread and a larger embroidery type needle, begin a running stitch without any knots in your thread. Work your way around the shape on the line of sewing. You'll be using this as a guide for pinching the seam allowance soon.
                                
 
Once you've worked your way around the melon and have no knots in your thread, switch to your applique thread and needle. Next, you'll mark the seam allowance of the full shape (add a 1/4" allowance to your actual size template if the original is not handy.
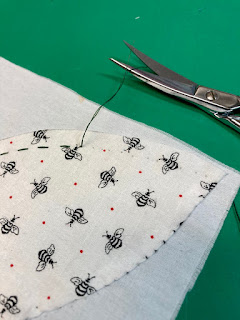
Once you've marked your bias piece of fabric with the full shape, cut the excess fabric, being careful not to cut through your background fabric.


When the melon shape plus seam allowance is cut and basted, remove the pins holding the two fabrics together. You will not need them moving forward for this block. You're now ready to begin to applique the melon shape. Remove 3-4 running stitches from the center right of the shape. Finger press your seam allowance and start your line of sewing by pulling your applique thread through the back of the melon shape underneath the seam allowance. Stitch into the background fabric and then your shape, working your stitches around the shape as you have practiced previously. Carefully stitch your pointy points and practice sweeping the seam allowance as you move counterclockwise. 


7.10.2020

Stitching Your Applique Melons, Curves and Pointy Points

Freezer paper method melons (or orange peels) will require some preparation before beginning this set of steps. Instructions are provided in order on the Applique Tutorials Tab. 

For this section, I always begin near the middle of one side of the melons and work counterclockwise with small stitches hidden by the applique. This continues one stitch at a time around the melon/peel until about an inch of sewing remains. At that point, I remove the freezer paper before finishing up the final inch. Photos should be helpful in pointing out each of the steps below. 
 
I begin my sewing by creating a small knot in the end of the thread (shown in contrasting quilting thread so it is visible). As in the top photo, I enter the underside of the seam at the edge of the melon then tuck that seam and keep it down by pinching my sewing as I move around the melon. 
I sew just one stitch at a time as I move counterclockwise around my shapes, making sure to pinch my work as I go to prevent knots in my thread and to keep the seam allowance tucked. I'm grabbing a bit of background fabric underneath the melon and just a bit of fabric at the edge of the shape before pulling the thread through and making another stitch into the background fabric, repeating continuously until I get to the points.


As you work towards your point, plan how you'll be able to get the remaining material for the seam allowance under your initial line of sewing. While you don't want a lump of fabric all in one spot and will be tempted to cut it way back, please don't until you see what remains on the second half of the point closure. If you cut too close, your fabric will fray. 

At the very tip of your shape, bring the needle through the point and again straight down into your background fabric to maintain a pointy point (for other visuals of this process, see pointy points photo tutorials & sweeping the points). Next you'll tuck any remaining fabric beneath your line of sewing. This process takes a few tries at first, please do not get discouraged. Be sure to check out the Sweeping the Points photo tutorial for better photos for this stage. 


Once your fabric is under the point(s) and out of your line of sewing, continue to work with small stitches around the curve until you have about an inch remaining.

At this point, loosen your freezer paper melon carefully (especially if you are using silk thread). Pull the shape out and finger press your final inch of seam allowance.

Usually, I'll place a few extra stitches along or beneath my shape before making a tiny knot. If you create larger knots, be sure it's hidden well below your shape.


Press your final melon after cutting the end of your thread and add it to your finished pile. Congratulations, you've completed an orange peel or melon shape.